
The purpose of an Elastic Job is to execute a T-SQL script that is scheduled or executed ad-hoc against a group of Azure SQL databases. Targets can be in different SQL Database servers, subscriptions, and/or regions. This blog post is quite long and heavy (code wise) so grab a coffee and follow through.
The architecture you could follow is shown below.

Setup
Setting this up does take some time. PowerShell is the way forward here rather than T-SQL. Looking at the above architecture you can see that we will need a database to host the job database and for this example a different server that hosts the target databases to where I want to code deployed to.
The setup between the databases involves databases scoped credentials and keys as summarised below.
The code you will see it what I ran and got the feature working (with all fake server names and passwords etc).

Once you are ready load PowerShell ISE and run the following commands.
# Installs the latest PackageManagement powershell package which PowershellGet v1.6.5 is dependent on
Find-Package PackageManagement -RequiredVersion 1.1.7.2 | Install-Package -Force

# Installs the latest PowershellGet module which adds the -AllowPrerelease flag to Install-Module
Find-Package PowerShellGet -RequiredVersion 1.6.5 | Install-Package -Force

# Restart your powershell session with administrative access

# Places Az.Sql preview cmdlets side by side with existing Az.Sql version
Install-Module -Name Az.Sql -RequiredVersion 1.1.1-preview -AllowPrerelease

#Enable your subscription
Register-AzProviderFeature -FeatureName sqldb-JobAccounts -ProviderNamespace Microsoft.Sql
Please note for this example I opened the firewall to allow all Azure IPs making this demo easier to show. I suggest you don’t do this and run the script and if I remember correctly the IP needed will be presented to you upon running the code.
# Sign in to your Azure account
Connect-AzAccount

# Create a resource group
Write-Output "Creating a resource group..."
$ResourceGroupName = Read-Host "Please enter a resource group name"
$Location = Read-Host "Please enter an Azure Region"
$Rg = New-AzResourceGroup -Name $ResourceGroupName -Location $Location
$Rg

# Create a server
Write-Output "Creating a server..."
$AgentServerName = Read-Host "Please enter an agent server name"
$AgentServerName = $AgentServerName + "-" + [guid]::NewGuid()
$AdminLogin = Read-Host "Please enter the server admin name"
$AdminPassword = Read-Host "Please enter the server admin password"
$AdminPasswordSecure = ConvertTo-SecureString -String $AdminPassword -AsPlainText -Force
$AdminCred = New-Object -TypeName "System.Management.Automation.PSCredential" -ArgumentList $AdminLogin, $AdminPasswordSecure
$AgentServer = New-AzSqlServer -ResourceGroupName $ResourceGroupName -Location $Location -ServerName $AgentServerName -ServerVersion "12.0" -SqlAdministratorCredentials ($AdminCred)

# Set server firewall rules to allow all Azure IPs
Write-Output "Creating a server firewall rule..."
$AgentServer | New-AzSqlServerFirewallRule -AllowAllAzureIPs
$AgentServer

# Create the job database
Write-Output "Creating a blank SQL database to be used as the Job Database..."
$JobDatabaseName = "JobDatabase"
$JobDatabase = New-AzSqlDatabase -ResourceGroupName $ResourceGroupName -ServerName $AgentServerName -DatabaseName $JobDatabaseName -RequestedServiceObjectiveName "S0"
$JobDatabase

# Create a target server and some sample databases - uses the same admin credential as the agent server just for simplicity
Write-Output "Creating target server..."
$TargetServerName = Read-Host "Please enter a target server name"
$TargetServerName = $TargetServerName + "-" + [guid]::NewGuid()
$TargetServer = New-AzSqlServer -ResourceGroupName $ResourceGroupName -Location $Location -ServerName $TargetServerName -ServerVersion "12.0" -SqlAdministratorCredentials ($AdminCred)

# Set target server firewall rules to allow all Azure IPs
$TargetServer | New-AzSqlServerFirewallRule -AllowAllAzureIPs
$TargetServer

# Create some sample databases to execute jobs against...
$Db1 = New-AzSqlDatabase -ResourceGroupName $ResourceGroupName -ServerName $TargetServerName -DatabaseName "TargetDb1"
$Db1
$Db2 = New-AzSqlDatabase -ResourceGroupName $ResourceGroupName -ServerName $TargetServerName -DatabaseName "TargetDb2"
$Db2
Next we call upon New-AzSqlElasticJobAgent to create the agent.
 Write-Output "Creating job agent..."
$AgentName = Read-Host "Please enter a name for your new Elastic Job agent"
$JobAgent = $JobDatabase | New-AzSqlElasticJobAgent -Name $AgentName
$JobAgent
Now we are ready to create the credentials and user accounts (please change the passwords for your environments)
 # In the master database (target server)
# - Create the master user login
# - Create the master user from master user login
# - Create the job user login
$Params = @{
  'Database' = 'master'
  'ServerInstance' =  $TargetServer.ServerName + '.database.windows.net'
  'Username' = $AdminLogin
  'Password' = $AdminPassword
  'OutputSqlErrors' = $true
  'Query' = "CREATE LOGIN masteruser WITH PASSWORD='yourpassword!12345'"
}
Invoke-SqlCmd @Params
$Params.Query = "CREATE USER masteruser FROM LOGIN masteruser"
Invoke-SqlCmd @Params
$Params.Query = "CREATE LOGIN jobuser WITH PASSWORD='yourpassword!12345'"
Invoke-SqlCmd @Params

# For each of the target databases
# - Create the jobuser from jobuser login
# - Make sure they have the right permissions for successful script execution
$TargetDatabases = @( $Db1.DatabaseName, $Db2.DatabaseName )
$CreateJobUserScript =  "CREATE USER jobuser FROM LOGIN jobuser"
$GrantAlterSchemaScript = "GRANT ALTER ON SCHEMA::dbo TO jobuser"
$GrantCreateScript = "GRANT CREATE TABLE TO jobuser"

$TargetDatabases | % {
  $Params.Database = $_

  $Params.Query = $CreateJobUserScript
  Invoke-SqlCmd @Params

  $Params.Query = $GrantAlterSchemaScript
  Invoke-SqlCmd @Params

  $Params.Query = $GrantCreateScript
  Invoke-SqlCmd @Params
}

# Create job credential in Job database for master user
Write-Output "Creating job credentials..."
$LoginPasswordSecure = (ConvertTo-SecureString -String "yourpassword!12345" -AsPlainText -Force)

$MasterCred = New-Object -TypeName "System.Management.Automation.PSCredential" -ArgumentList "masteruser", $LoginPasswordSecure
$MasterCred = $JobAgent | New-AzSqlElasticJobCredential -Name "masteruser" -Credential $MasterCred

$JobCred = New-Object -TypeName "System.Management.Automation.PSCredential" -ArgumentList "jobuser", $LoginPasswordSecure
$JobCred = $JobAgent | New-AzSqlElasticJobCredential -Name "jobuser" -Credential
Next is the creation of the target groups and the actual T-SQL to run against the database.
Write-Output "Creating test target groups..."
# Create ServerGroup target group
$ServerGroup = $JobAgent | New-AzSqlElasticJobTargetGroup -Name 'ServerGroup'
$ServerGroup | Add-AzSqlElasticJobTarget -ServerName $TargetServerName -RefreshCredentialName $MasterCred.CredentialName

Write-Output "Creating a new job"
$JobName = "mainjob"
$Job = $JobAgent | New-AzSqlElasticJob -Name $JobName -RunOnce

Write-Output "Creating job steps"
$SqlText1 = "IF NOT EXISTS (SELECT * FROM sys.tables WHERE object_id = object_id('votetable')) CREATE TABLE [dbo].[Votetable]([voteId] [int] NOT NULL);"
$SqlText2 = "IF NOT EXISTS (SELECT * FROM sys.tables WHERE object_id = object_id('votetable2')) CREATE TABLE [dbo].[votetable2]([voteId] [int] NOT NULL);"

$Job | Add-AzSqlElasticJobStep -Name "step1" -TargetGroupName $ServerGroup.TargetGroupName -CredentialName $JobCred.CredentialName -CommandText $SqlText1
$Job | Add-AzSqlElasticJobStep -Name "step2" -TargetGroupName $ServerGroupExcludingDb2.TargetGroupName -CredentialName $JobCred.CredentialName -CommandText $SqlText2

Write-Output "Start a new execution of the job..."
$JobExecution = $Job | Start-AzSqlElasticJob
$JobExecution

Now, if you connect via SSMS to the host server where the job database is, you can issue the following code to get confirmation of a successful run,
SELECT * FROM jobs.job_executions

ORDER BY start_time DESC

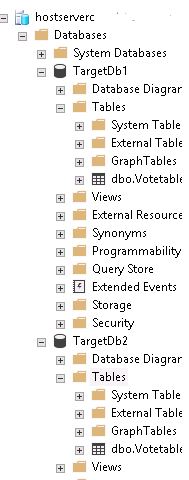
Connecting to the target server you can see the tables have been created.
Hopefully you can see the benefit of setting up elastic jobs. Just one last important point is that the scripts you run must be idempotent. That is the script can survive during network issues. An idempotent script has the same result even if it has been successfully run twice. It helps to follow this approach.

Pingback: Creating Azure SQL Elastic Jobs – Curated SQL