
Now let’s start the process of creating a snowflake account in the Azure Cloud. You can sign up for a free trial from here – https://signup.snowflake.com/ I am going to bypass this and go straight to the setup screens. (This is slightly different because as an org-admin I have the power to create accounts)
Select the cloud provider and edition you require; we have already discussed these options before. You know me, its going to be Azure but feel free to dive into AWS or GCP.
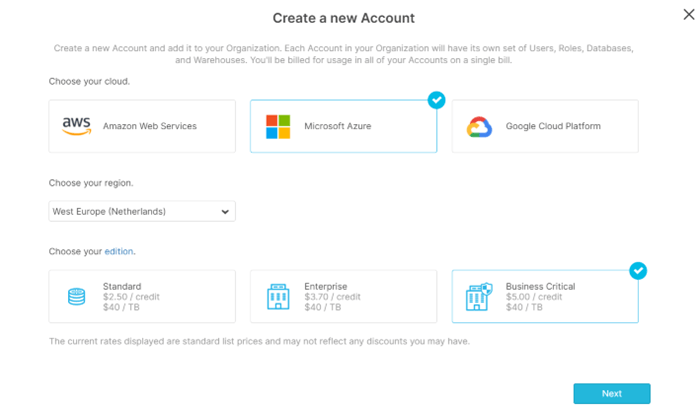
Setup the account admin details, there should not be many account admins, this is a very powerful role.

That’s it!

By default, your URL will be like:
<accountname><region>.<cloudprovider>.snowflakecomputing.com/
(This maybe different if you use organisations and/or private link)
Sign in using your account admin details and have a tour.
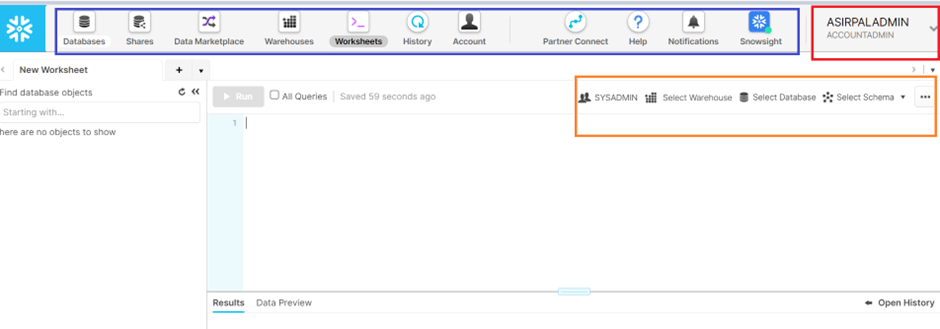
Let’s look at the different coloured boxes.
Blue box – this ribbon at the top of the interface is where you will see all the different areas that you will be using on a day-to-day basis inside of snowflake:
- Databases – well it’s obvious what this is. No issues running PBs here.
- Shares – this is where you build both inbound and outbound shares which can be to other accounts internal or external.
- Data Market place – if you want to enrich your datasets with real world this is exchange is the place to go to. This can vary from wide ranging subjects such as weather data to even blockchain metrics.
- Warehouses – this is where you can add, delete, tweak your compute requirements.
- History – this is a cool area where you can query a user ID and see the past query history execution for that user. It will show you the SQL, explain plan, what warehouse was used, duration and times.
- Account – This is a useful area (especially for account admins) here I tend to look for information around roles, users, network policies and resource monitoring.
- Partners connect – There are some premium partners out there that work closely with snowflake. In this section you have access to these companies where usually you can build out a proof-of-concept area for the tooling within snowflake. Such companies include Qlik, dbt, HVR – there are many more!
- Help – linked area to official snowflake documentation.
- Notifications – if there are some important announcements from snowflake they will pop up here, you don’t have to set this here. You have options of getting notified via email if required.
- Snowsight – this is the next version of the interface, more on this another time.
Red box –
- This your role selector. Depending on how you have setup your snowflake dictates what roles you can see here. By default, as an account admin and the rule of role inheritance I have access to all other roles, as shown below.

Orange box –
- This is where you set your context. Normally when operating within snowflake you state what role to assume, what warehouse to use and then the database and schema context. You can also do this via code such as:
USE ROLE X;
USE WAREHOUSE MY_WH;
USE DATABASE CLOUD_DB;
USE SCHEMA TEST;
This really is just a whirlwind tour of the snowflake interface; the aim is to investigate these areas / subjects individually over time. Hopefully it will be useful.

Pingback: Creating a Snowflake Instance – Curated SQL